

Accurate marking of mortises, dovetails, lap joints and what have you, needs good tools. I bought two different marking gauge models from Veritas. Let’s review!
I’ve seen the Veritas marking gauge in several videos, and being the simpleton that I am – I ordered one of Canada’s finest. I opted for the eccentric metric one with micro adjustment. I did that in October 2020. One consequence of the pandemic is that the production of almost anything grinds to a creep, resulting in delivery problems. Tools from Veritas is no exception. The gauge finally arrived June 1st 2021. 8 months! I have to give credit to my dealer the store I ordered the gauge from; they contacted me informing me about the delay. In one of their updates, they told me that they had some non-eccentric gauges on the way. Was I interested? You bet. Soon after, I got it in the mail. A few weeks later, the eccentric one arrived too! My first reaction was “you scoundrels!” since they got me to spend more money on another tool whilst the one I ordered was just around the corner! But now I have two. Two shiiiiny ones!
Joking aside, I’d planned to get two all along as I know from experience that having just one marking gauge is less than ideal. So kudos to the store for providing me with options. Having worked in retail for over a decade, I know and appreciate the importance of good customer service! And added sales…. I think they got me. It’s all good, though!

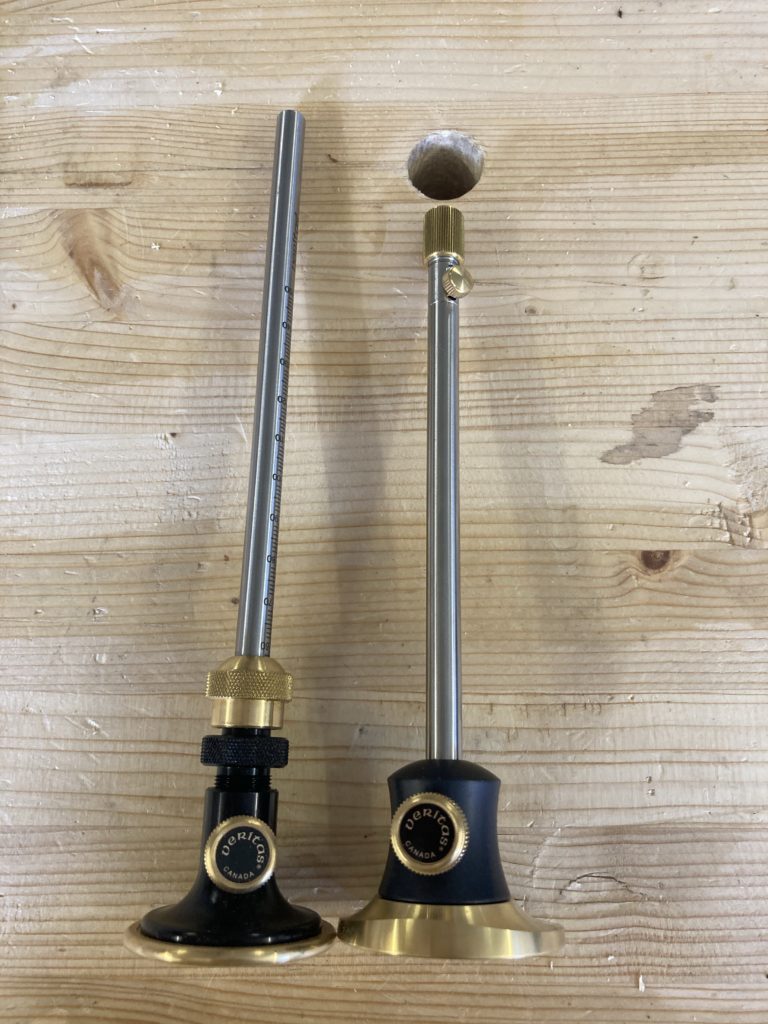
The difference between the two models is that the eccentric one has the rod placed off center. I thought this would be advantageous on the bench – no rolling around. It also turns out that the eccentric model feels better in my hand. It “grips better” so to speak. It does however make the thing rather hard to rotate during the marking if one needs/wants to (more on that in a bit).

The micro adjustment is a bit different on the two models, but works equally well. On the eccentric one, the adjustment is done at the end of the rod. A small thumb screw locks the micro adjustment in place. The end of the rod has a knob which one turns to adjust the depth of the wheel. Make sure you have the adjuster set in the middle so that you can adjust in both directions.
On the regular one, the adjustment is done by rotating the black knurled knob. The brass knob locks the rod to the black knob for adjustment. Compared to the eccentric model, this is rather cumbersome. You do need two hands to adjust the regular one. There are two points where the rod can be locked: the brass knob and the “Veritas” marked thumb wheel. You need to grip the black knurled knob to loosen the brass one so that you can slide the rod freely – for example to gauge the depth of a mortise or a hinge recess. The eccentric model is far better in this respect, as you can do it one-handed if need be. This is really advantageous.

You lock the setting (locks the rod) with the thumb wheel with the Veritas logo.
All in all, I like the micro adjuster a lot better on the eccentric one. It is far less fiddlesome, and you could do it one-handed (great if you need to hold a piece in position, etc). That being said, both works very well and gives more than adequate accuracy for wood working.

The markings on the rod serves as good guidelines, but are of little use since they do not provide any accuracy to speak of. Better to use a ruler or calipers, I think (calipers would be great, as you can be extremely accurate!). Actually, rotating the black knob means that you rotate the rod too – and the markings swings away from you. Better rotate the housing – and that renders the whole operation a bit awkward.
As for the length – the regular one is a couple of cm longer, and because of the micro adjuster the usable length is about 7 or 8 cm more (2 3/4” to 3 1/8”). The graduations stops at 15cm (appr. 6”), and at those lengths I’d use a ruler and a knife as it becomes hard to use a marking gauge accurately. Could use the gauge to make two nicks for the knife and use a ruler, of course. As such, I do not think that the rod length has any importance.

The business end of the rod has a small disc cutter. The two models has different cutter wheels, which I think is an odd choice by Veritas. Why not have one type for all models? I see no advantage on one or the other. My bet is different versions / upgrades, and they have to go through their stock of the old model.
The cutter does not rotate like a wheel, but you can roll the whole gauge if you like (remember what I wrote about the eccentric one being harder to roll, though). In practical use, this is not an issue in my opinion. The cutter has the bevel on one side, which means that it won’t follow the grain. Still, press the gauge firmly against the wood to eliminate any possibilities for such issues. The disc can be replaced when it dulls, but people has pointed out that it can be sharpened on the diamond plates since one just need to lap one side of it.
Still, I’d recommend order a replacement and keep it in case of a large nick.
A quick squiggle of wax will make the gauge slide easier against the wood.
If you haven’t heard about “knife wall” yet, read this article by Mr. Paul Sellers. Using a knife over a pencil increases your accuracy tremendously. It also gives you a positive reference for your chisel, it is dead accurate for marking 4 sides of a piece, it will prevent tearout on the exit side of a saw kerf…
The marking gauge is just easier to use in certain cases. For some application where one would think a marking gauge would be best, the knife might just be a better choice. How to use a marking knife is one of the vital things you should do/learn/explore!

Compared to a pin marking gauge of a classic type – here represented by my combination gauge (actually a combined marking gauge / adjustable mortise gauge) – I find that the markings left by the wheel in soft woods (pine, fir) is rather hard to see. It is REALLY fine. On hard woods (oak, ash, birch) it is a bit easier. This is of course advantageous in that it won’t leave very visible marks, i.e. score lines for dovetails – although one could debate that such lines are the visible cues that the dovetail was hand cut). It is easy enough to pencil in the line if needed. Let’s take a look at different markings in white oak:


The pin leaves a more visible line, especially in soft woods, if one press down harder. The disadvantage is that the pin tends to follow the grain a bit. I do not find that the larger fence is better; it actually makes the combination gauge a little bit clumsier to use compared to the Veritas ones. The “peel the apple grip” feels natural and easy.
The pin also tends to find my fingers very easy, resulting in squeals and cries for bandage. Hey, don’t laugh! It is PAINFUL! My daughters are correct, by the way: puppy or princess adorned bandage do help with owies.
In the images above, I used a firm pressure. I tried to use the same amount of force on the gauges. As evident, the wheel makes a much finer line. In some situations, the line can be very hard to see. Either pencil in the line, rub a coloring pencil on the wood before marking (like metal machinists do) or select the pin marking gauge. The deeper, coarse line from the pin could be advantageous when thickness planing. You plane till the edge becomes fuzzy; you are in the middle of the line by then. A swipe or two more, and you remove the line. In most other cases, I think I would prefer the finer line. It is easier to remove, and if left in the project it won’t be as prominent – for instance in dovetails.
There are no difference in the marks left by the two wheel models. I do find the eccentric a bit more comfortable and easier to use.
Conclusion and summary
Both gauges works very well and are built both with beautiful finish and they feel rugged. Truly a lifetime tool! I would recommend getting the eccentric model for the following reasons:
- Can be adjusted one-handed
- Better “grip” and easier to handle
- Won’t roll around as much
- Far better micro adjustment method: easier and one-handed.
Veritas also makes a double version – in effect a combination gauge, although you cannot mark both lines at the same time. In stead you mark one, spin the gauge 180 and marks the other one. And Veritas being Veritas (“useful addons sold separately”), you can buy a clamp as an addon – screw the clamp in place, and the two rods are locked. Set it to the width of a chisel, lock the rods and then adjust to desired depth. That clamp should’ve been included, though…
I do think Veritas missed a great opportunity here – A small etch or a milled mark would’ve made this a “must have” tool. Imagine a squiggly smile on the lower half…

I really like the tools Veritas makes. High quality and attention to details, but they do miss the ball on some areas. It seems that the design team churns out an idea, but they do not actually prototype the idea in practical use. The micro adjustment method on the regular marking gauge is such an example – too cumbersome. The micro adjustment rod is great! Although I’m pretty sure the increased manufacturing cost plays a role here. I understand that one can custom order these – rods with or without micro adjustment and/or measurements etched.

These aren’t cheap, but not that expensive either. Certainly worth the price tag considering they are a lifetime tool. Do get a spare cutter or two, though. In 70 years it would be nice to have for a future woodworker (or yourself, being an ancient fart), just as the spur nickers on the Stanley 50 plough planes. I would get one of these and a couple of the pin marking gauges (which is pretty easy to make by yourself, by the way…). Having a couple of gauges is a luxury worth having – and one of the luxuries that can be pretty cheap.
I have seen knock-offs of these gauges on Wish, Alibaba and the like. I’d buy the Veritas ones. After import taxes, freight costs – the price difference won’t be justified. Buy from Veritas, and you KNOW you’ll get good quality – and you support a manufacturer important for woodworkers. It’s like shopping locally – if you want access to good products, support those who deliver good quality. We buy our eggs from a local farm. You should too, if you can.
You won’t regret getting one of these. Mark my words, ey!
Pingback: The Ashley Iles butt chisels | Fagerjord.org